SEAN DUFFY 97016726
For this module we was asked to download certain editing apps like Snapseed, adobe photoshop, Lightroom and others and to start taking images and start edit them images and to document what your editing

SNAPSEED EDITS

This is the orginal picture of my youngest daughter playing on a swing in worden park in Leyland before editing it

Firstly i changed the frame to number 5 on the tools then i changed the frame width by -10 then i played around with the exposure and changed it by +0.7 i then went to the tonal tones tool and then changed the tonal contrast by +45 then i went on the grainy film tool and changed the grain by +25 and then changed the grain template to A04

This is the original image of my daughter paige on a swing in worden park in Leyland

For editing this image i started of with the white balance and changed the temp by +15 i then went to the drama tool and changed the template to bright number to with a filter strength of +90 i then went to the cropped tool and i cropped the image size to 4.3

this is the original image of my two youngest daughters in my front room watching Dennis the menace

So for this image i went to the black and white tool and i changed it to template neutral black and white i then went on the vignett tool and i changed the outer brightness up by +50

This is the original image of my tWo daughters playing on the bouncy castle in the front garden during lockdown

For this image i went into the retrolux tool and i changed it ot template retrolux 1 and turned the brightness down by -39 i then messed around with the healing tool were i used the healing tool to remove the trampoline in the background of the image

This is original image of my front garden after i had just hooverd the grass

So for this image i started off by ging to the vintage tool and changed the brightness from +30 to +40 i then went to the drama tool were a changed the template to drama two and changed fiter strength from +70 to +90 i then went to the double exposure tool were i added anothe image of my daughter playing on her slide

This is the orginal image of my daughter at marton mere caravan park in Blackpool

For this image i started at the look tool and changed to the morning template i then went on the lens blur tool in which i changed the blur strength from +30 to +46 then next edit tool i used was the frame template were i changed it to frame twelve and then i changed the width of the framr from 10 to +21 my final edit was the tonal contrast tool were i changed the high tones from +30 to +45

This is the original image of me and actor Adam Fogerty on the central pier at blackpool

For this image i started off with the details tool in which i changed the structure from +30 to +41 i then went on the healing to and i edited out the young boy and the girl from the background i then went to the glamour tool and changed the glow from +27 to +37 and then for my final edit i went in the retrolux tool were i changed the template to retro 20 then i turned the brightness to from -40 to -20

This is the original image before editing and is of the vistor centre in sunnyhurst woods in Darwen

The first thing i did for this image was to go to the double exposure tool and layer on a image of a yew tree i took in Leyland i then went an the vignette tool and changed the template to style 2 and changed the outer brightness from +20 to +32 and then i went on to glamour glow tool were i changed the glow from +27 to +47 i then my last edit was the grain tool were i changed the template to B01 and changed the grain from +25 to +31

This is a image of me and my daughter on Darwen moors as i am try to get some shots with my camera and tripod

Firstly i went on the glamour glow tool were i changed to +57 and preset four then i went on the drama tool were i changed it to drama preset 2 then on to the grainy film tool were ichnged +25 and preset b1 and finally vignette tool were i changed the outer brightness of the image down -50

LIGHTROOM
My next editing app was Lightroom were i started off with a image of my youngest daughter playing in the sea at Blackpool

Firstly i started off on the light tool were i turned up the exposure to+0.73 i then turned the contrast up to +37 i then went to the highlight setting an turned down to -36 i then went on the shadow setting were i turned up to +79 i then went to the white setting and put it to +7 and finally for the light tool setting i turned the blacks up +41, i then entered the color tool were i changed the saturation up to +35 then i cahnged the tint to +17 and then the temp down -3 my next tool to use was the effects tool were a changed the vignette -73 and finally i changed the clarity up to +44

My second image on the lightroom app is of my daughters at paulton park in Southampton

Firstly i have started by going on the optics tool and removed the chromatic aberration tool i then went on to the color tool were i changed the the white balance to a custom tool i then went to the mix color tool were i changed the hue to -44 then i turned up the saturation up to +78 and finally for that tool was turning up the luminance to+90 and then i went to the light tool were turned up the contrast to +58 and turned the blacks down to -90 and then i went to the detail tool were changed the sharpening to 97 and the final tool a used for this image was the effects tool were i changed the vignette to +62 to give that a white border

My next image to edit onLightroom app is off my wife and i at my sisters wedding in darwen

Firstly i started of with the presets tool were a changed it to the vivid setting, i then went on the effects tool were changed the clarity of the image up +70 i then went on the feather setting were changed from 50 to 71 i then went on the midpoint setting i changed from 50 down to 11 and i then turned the highlights up to 90 my next tool was the color tool were i changed it from color to a black and white image were i then changed the temp to +48 and finally for this image i turned the tint to -63

My fourth image to edit for this lightroom app is off a lion at Knowsley safari park in liverpool during lockdown

Firstly i started off with the prtics tool were i then enabled lens corrections setting, I then went into the effects tool were i started of changing the texture up to +60 then i changed the claity to +38 I then went on the dehaze setting and changed it to -56 and finally for that tool i changed the vignette to -44 the next tool i used was the color tool were i changed the vibrance setting to +92 and chanded the tint up to +19 my final tool for this image was the light tool were a changed the exposure -0.27, I then changed the contrast setting to +47 and i then changed the whites setting down to -66 and then into the blacks setting were i changed up to +87

My fifth image to edit for this Lightroom app is of a image of me catching a carp while fishing in Burnley

For this image i started of with the effects tool were i firstly changed the texture down to -39 i then went into the clarity setting were i turned up to +72 and the chanded the dehaze up to +92 and the feather setting were i turned it down to 27 my next tool to use on this image was the Color tool were i changed the temp up to +67 and i changed the tint up to 61 and finally i went on the Crop tool were a flipped th image rotated left at 5.83

my next image to edit on the lightroom app is image of my wife and daughter paige

For this image i started of with the crop tool were i flipped the photograph my next tool to use was the light tool were i turned the exposure of the image down to -0.12 i then changed the highlight down to -68 and the whites of the image up by +37 and then finally the preset tool were i changed it to the high contrast and detail

my next image is of my daughters after they had just finished doing there pumkins for holloween

Firstly i used the crop tool were i flipped the photograph i then went on the light tool were i changed the exposure to +0.76 and the shadows to -87 i then turned the clarity up to +100 i then went on the color tool and changed it from color to black and white and finally the effect tool and changed the dehaze of the image up to +30

my next image to edit for the light room app is of my two daughters at Darwen tower

Firstly i went into the light tool were i changed the exposure up to +2.64 the contrast up to +68 the highlight down to -76 and the shadows up to +50 my next tool to use was the effect tool were i changed the clarity of the image up to +67 and finally the detail tool were i changed the sharpening of the photo up to 37

my final image of the lightroom app is of my youngest daughter gracie with her pumkin

Firstly i went on the crop tool were i flipped the image then i went on the effects tool were i changed the clarity +54 then the dehaze tool i changed to +48 and then the vignette tool were i changed up to +57 and the color tool were i changed the temp of the image down to -77


VSCO APP

Here is a image of my wife and two young daughters in front of homemade tepee in Darwen

For this image i went into the exposure tool were i turned down to-3.5 then i went into the sharpen setting and turned it up +4.5 i then changed the clarity to +11.4 then i changed the skin tone -4.7 and then i went into the white balance tool and changed the temperature to +3.1 and the tint to -4.5 and finally the split tone tool were i changed the red shadows tint +7.4

this is a image of my family on a walk during half term before i edited this image

Firstly i turned up the exposure to +3.1 then i changed the contrast down to -1.6 then i changed the grain of the image to +80 i then turned up the saturation to +60 and then the white balance were i changed the temp up to +4.4 and the tint up to +56
my next image is of my daughter graice on the way up to darwen tower during half term

So firstly for this image i went on the adjust tool were changed the size of the image to 2.3 i then went on the tone tool were i changed the highlights up to +3.3 and the shadows up to +10.4 then the vignette were i changed up to +12.0 and changed the sharpening up to +6.5


This is a image of my camera on the tripod at desused stone quarry in Rossendale before editing it

Firstly for this image i went on the presets tool and changed it to tool c1 I then went into the contrast app were a changed down to -3.5 then i went on to the saturation tool were i changed it up by +37i then into the grain tool to change up to 8.5 and finally to the white balance to change the temp 1.1 and the tint of the image up to +5.3

This is a image i took at a stone quarry before its been editing it

For this image i started of in the contrast tool were turned the contrast down a little bit to -2.4 I then went on the highlights tool were a upped it +7.0 i then went into the sharpen tool and turned that up to +9.6 i then went on the white balance tool were i then changed the temperature up to +60 and then the tint of the image up by +4.6 and finally for this image i changed the skin tone down -6.0

Here is a photograph of a rock wall used by climbers at old disused stone quarry before i edited the image

For this image i started on the presets tool were i changed it from normal to preset c1 I then went on to the grain tool were i changed the grain of the image up a little bit +2.5 my next tool i used was vignette tool were changed up to +8.4 and finally for this image i changed the saturation up to 3.6

Here is a image I took at Tockholes res on a lovely day before i started to edit this image

Firstly for this image i changed the presets tool from normal to f2 preset I then went on the sharpen tool were i changed up to +6.9 i then went on the vignette tool were i changed up to +11.3 the next tool i used was the white balance tool were i changed the temp of the image down a bit to -1.2 and the tint up to 4.7 my next tool to edit with was the tone shadows tool were i changed up to +10.1 i then changed the clarity of the image up to 8.8 and finally for this image i used the exposure tool to take it down a bit to -5.7

Here is a image of two rhinoceros at Knowsley safari park on a day out with the family during lockdown before i have edited it on VSCO

I started in the preset tool were i changed from normal to b1 preset witch changed it black and white i then went on the grain tool were i changed the grain of the image to +10.1 my next tool to use was clarity tool were a changed that up to +11.0 my next tool was the vignette tool were i changed up to the highest it went at +12.0 and finally i changed the contrast down a little to -4.0

Here is a image of a canal barge i took on the canal at the back of smyths toys while my wife was shopping he is the image before i edited on VSCO app

For this image i started off at the preset tool were i changed it from normal to c1 preset i then changed the exposure down a little bit to -0.5 my next tool was the contrast tool were i changed the contrast up to +3.6 i then went on the saturation tool and changed to -0.6 my next tool was the grain tool were i changed the grain of the image up to +12.0 then i went on the highlights tool i changed it up to +6.0 then i went on to the clarity tool were i changed that up to +9.7 and finally the white balance tool to change the temp of the image up a little bit to +2.6 and the tint up to +9.7

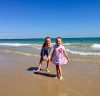
This an image of my youngest daughter Gracie-Lou on Blackpool beach during the summer holidays. This is the image before i edit it on VSCO app

So firstly i went on to the adjust tool were changed the image down to 3.4 ratio my next tool to use was saturation tool were ichanged up to +5.7 i then went on the skin tone tool were i changed that down a bit to 5.4 then i went on the split tone tool
were i then changed the Blue shadow tints up to +5.8 and then for the final edit if this image i used the white balance to turn up the temp a bit to +1.1 and the tint of the image down to -0.6

INSHOT APP

My first image for the inshot app is a image of my German shepherd Smokey out and about up Shadsworth

Firstly i started off on the filter tool were I changed the original image to preset warm i then went on the adjust tool contrast up and the saturation up my next tool to use was the text tool were i wrote smokeys name in red and finally the rotate tool were i fully flipped the image

This is a image of an African Bull i took at Knowsley safari park during the summer before editing it

Firstly i went on the canvas tool were i changed the size of the image to 9.16 i then went on the adjust tool were turned the contrast up then i changed the tint up i then went on the grain tool and turned up to 48 and the vignette up 33 and the finally the text tool were a wrote the bull in red

Here is a image of clithroe castle at the begining of October i took in a lovely evening before editing it

So firstly i went on the color tool were i changed the blue down 60 percent i then went on the adjust tool were contrast up 2.1 then the tint up to 5.0 then i changed the saturation down a bit to 2.0 and finally the lightness down to give it a later evening look to it

Here is an image of my daughter Paige chilling out on the deck chair in the front garden of my house

For this image i started of on the adjust tool were i changed the saturatio up by 40 i then changed the warmth setting up +20 my next tool was the tint setting were i turned it down to -27 i also turned the highlights of the image down to -20nand the contrast was turned up 34 and finally the sticker tool were i added a love heart to the image

Here is an image of me and my two youngest daughters walking through the wood on the back down from Darwen tower

Firstly i started of on the rotate tool and fully flipped the image my next tool to use was adjust tool were i changed the grain up to 74 the fade up 73 then i turned the saturation down to -33 i then turned the shadows down to -35 and finally the vignette setting i turned it up to +81

Here is an image i took of my daughter Graice sat in the car with her little Elton John glasses on

Firstly i went on the canvas tool were i changed the size of the image to 2.3 i then went on the adjust tool were i turned the lightness to -33 i then turned the saturation of the image up to 33 i then changed the tint to -23 my next setting was to turn the sharpening up to 96 and the shadows down to -33 and finally the effects tool were i changed it to preset glitch

Here is a image of a little waterfall in bold venture park in Darwen during half term holidays

My first tool i started off with was the canvas tool were i changed it to preset warm my next tool was the adjust tool were i turned the contrast up 33 and the vignette was turned up to +66 i then changed the saturation down to -45 then the lightness setting down to -50 and finally the highlights were i turned them down to -33

Here is a image if the north west air ambulance i took an photograph of when it landed on Shadsworth all weather pitch

Firstly for this image i started off with the text tool were i added nhs and saving lifes to the image i then went intto the adjust tool were i started of by turning the contrast up to +16 then i changed the warmth setting up to +44 my next setting was the saturation witch i turned up +48 and finally the sharpen setting were i turned up to +93

Here is a image of stump with money stuck in the top i took during half term at Tockholes woods, you could say its a money tree

Firstly i went on the canvas tool and took the frame of the image off i then went on the filter tool were i went on preset Dark my next tool was the adjust tool were i turned the contrst up +26 then i changed the warmth of the image to -33 before changing the tint up to +19 and then the vignette up to +92 and finally the rotate tool were i rotated the image to the left

Here is a image of me trying to be a photographer in sunnyhurst woods talking photographs of little waterfalls

So my final edit of this app i started of with the filter tool were i changed to preset ginkgo i then went on the effects tool were i changed it to preset glitch mode and then i went on the adjust tool were i turned the contrast up to +16 then i turned the warmth of the image to -40 then i changed the tint of the image up to +41 then i turned the shadows down to -36 and finally i turned the grain down to -78
MY TEN IMAGES
my first one
image two
image three
Processed with VSCO with c1 preset
image four
image five
image six
image severn
image eight
image nine
image ten

PHOTO EDITOR


For this image i started off by changing the saturation up a little bit then i went on the crop tool were i changed it to size 4.6 from the original size i then went into the adjust tool were i changed the brightness up to give it a brighter feel to it then i changed the contrast a little bit and finally the sharpness tool were i changed it a bit to give it a more clearer image


For this image of my daughter with her two naughty elfs i started of turning the exposure down a little bit then i went on the vibrance tool were i changed up a bit and same with the brightness tool i then went on the vignette tool were i changed it to the highest it could go then i changed the tint of the image way down and finally the effects tool were i changed to template clyde.


For this image i started of by turning the exposure down a touch then i went on the shadows tool were i turned them up the next tool to use was the saturation tool were i changed it up a little bit then the fade tool were i changed down 25 percent then i went to the crop tool were i cropped the image to 9.16 and then i changed the warmth of image down to give it a cooler look and finally i changed the sharpness of the image up by fifty percent.


For this image i strated off by changing the shadows tool up a touch i then went on the saturation tool were i turned that up fifty percent then i changed the warmth of the image down twenty percent and then i changed the sharpness up a little bit and then finally i went on the text tool were i wrote on bonfire night on the bottom of the image of my youngest daughter on bonfire night.


For this image of me and my four daughters i started of by changing the sharpness up a bit then i went in the adjust setting were i then changed the saturation up a bit and then i changed brightness down ten percent i then went on shadows tool were i turned it up thirty percent and then the exposure tool were i changed the exposurenof the image down about twenty percent and i then went on the focus tool i changed it to radial and then finally the text tool were i wrote on family at the top of the image.


For this image i started of with the adjust tool were i changed the brightness up a touch i then turned the saturation down quite a bit then the tint tool were i changed it up to full i then cropped the image to 3.4 and finally the focus tool were i changed it to radial to put all the focus to the top of the image.


For this image i started of by turning the exposure of the image down about sixty percent the next tool to use was the saturation tool and i turned that up fifty percent to get the colour in the face i then turned the shadows down to to darken the background i then turned the vibrance of the image by thirty percent and finally the text tool were i wrote Birthday girl at the top of the image.


for this image i started off by going in the effects tool and changing it to template Cruz i then started turning the sharpness up on the image i then turned the brightness and exposure up a touch i then went on the blur tool were i blurred all the toys in the background and finally cropped the image to 9.16 ratio.
MY TECHNOLOGY AND INNOVATION ESSAY 1
I am writing this essay in response to this journal Gomez Cruz and Eric T. Meyer (2012) Creation and Control in the Photographic Process :iPhones and the emerging fifth moment of photography, photographies,5:2,203-221, DOI: 10.1080/17540763.2012.702123, I have started with the late 18th century and the beginning of the 19th century just to show how much the photographic industry as evolved in last 150 years.
By reading this article I think the most significant event in the history of amateur photography was the introduction of the kodak camera, in 1888 invented and marketed by George Eastman (1854-1932) a former bank clerk from Rochester the kodak was a simple box camera that came loaded with a 100-exposure roll of film, Fineman, (2004), Which meant that millions of people were now able to take the own photographs.
If we just jump forward to end of the 19th century where mobile phones had emerged on to the scene and In May of 1999, Japan was the launch pad for the Kyocera VP 210 it was the first such phone with a built-in camera that was sold commercially to the general public, Callaham, (2019).
This meant millions of people could take a picture everywhere and anywhere with this hand size camera that got me thinking what would the future of photography be in fifty years with how technology is now there are a pair of glasses out in 2020 called the ORBI Prime 360 4k glasses were you can take photographs and record while you walking about I seen an article about Elon Musk the founder of Tesla who invented a microchip to store in the brain to help with early signs of disease Elon Musk has announced that his brain chip company Neuralink has been working on technology that would theoretically be able to implant an AI enabled microchip into the human brain to both monitor and stimulate brain activity. the aim is one day use the technology to help treat neurological conditions and diseases Neuralinks tech has two main components the first is the chip which would be connected to electrodes implanted in someone’s brain and the second is sewing machine like insertion device that surgically implants those electrodes, , Hamilton, (2020).
In response to that article I started to think how this sort of microchip could be implanted into the back of your ear, or when you have wires on the side of your head during brain scans and how it is connected to the brain electrolytes and that the brain control’s the eyes. I believe that a near future microchip will be able to download everything you see in a photographic way during your time awake and then simply put the microchip into your laptop or computer as you would with your SD cards from your normal digital camera. Do I believe this a bit far-fetched? In my opinion, I honestly don’t as you can buy glasses with built in cameras on them now and with the way technology progressed in last 150 years, and that humans are interest in combining with AI machine and technology’s is very much at the forefront for the next coming decades especially when you have someone of Elon Musk’s wealth and drive and determination, he could be the person to take technology to the next step in the 21st century.
Reference list
J, Callaham. (2019) can be found at: www.androidauthority.com [accessed 11th October 2020]
M, Fineman. (2004) Kodak and the Rise of Amateur Photography. can be found at: www.metmuseum.org [ accessed 10th October 2020]
I, Hamilton, (2020) can be found at : www.buisnessinsider.com [accessed 10th October 2020]
TECHNOLOGY AND INNOVATION ESSAY 2
THE APP CONCLUSION
APP CONCLUSION
The first editing app I started off with is called Snapseed, which had a lot tools to use in their edit room from tonal contrast, the grainy film, retrolux, Hdr and many more. Firstly, I changed the frame to template number five, then I changed the exposure and changed by 0.7. I then went on the tonal tones tool and I changed the tonal contrast of the image up to +45. I then went on the grainy film tool and changed the grain of the image up to +25 and finally, I changed the grain template to Ao4.By doing these changes it give the image a different look as I changed the tonal contrast In the back ground of the image to be able to take your eye to the person in the picture a bit more than before I edited it also by changing the grain of the image give it more detail to the foreground of the image in my opinion I was pleased with outcome.
The second editing app to use was VSCO, this app was not half as good as Snapseed as it seems to be more of a social media app such as Facebook and Instagram. The edit tools were easy enough to use again, with plenty of options from there tool bar and I started off with the exposure tool where I turned it down to -3.5 from 5.0. I then used the sharpen setting and turned that up +4.5 from zero. I then went on the clarity tool and changed the clarity off the image up to 11.4 from 5.0. The next tool to use was the skin tone tool where I changed the skin tones down a little bit from 5 to 4.7, and then I went on the temp tool and changed that to 3.1. The final thing I changed for this image was the split tonal tool, where I changed the red shadows tint up from 5.0 to +7.4.By doing these edits I managed to turn a quite a ok image in to good one by doing these edits the original image was a bit bright with being a sunny day so by changing the exposure it give it more of dull effect in the background with sky and by also changing the temp it gave it a faded look to the image like it was shot back in the 1980s which I think works for this particularly image and I am happy with outcome of this edited image
The third app I used was Adobe Lightroom. This app was quite like Snapseed although, with not as many options. To use this app, you would have to subscribe to them to get most of the tools, and to be honest it was not worth the subscription. Especially has the two previous had so many edit tools for free, and they were easy to use than the Lightroom app. It was a lot more straight forward to use the tools and to save your images. Therefore, it seemed easier to me. So, I started off with the light tool where I changed the exposure of the image up to 0.73. My next tool was the contrast tool, where I changed the contrast of the image up a little bit to +37, then I changed the highlights down to -36 and the shadows tool up to+79. My next tool was the colour tool, were I changed the saturation up to +35, in the same tool I changed the tint +17 and then finally I used the vignette tool and changed that down to -73. This image was of my daughter in the sea in the original image is good but it was to dull in and around the background so I turned the exposure up to bring more light to the image by doing that I needed to turn the contrast up to keep the colour right I then changed the shadows up to give the water a brighter look to it and then I changed the vignette to put I border around the edge and for my daughter to stand out more in the image I was very happy with the outcome due to the edits I had done.
Continuing forward the fourth app which was called Inshot, this app was more of fun app to use with a lot different editing tools from the previous apps. I have used with tools where you could add different stickers to your images and funky writing for the text tool so for this app, I started off by changing the original image to a template called preset warm. I then went on the adjust tool and turned the contrast of the image up as well as the saturation. The next tool was the writing tool where I wrote my dogs name Smokey in bright red. And finally, the rotate tool where I fully flipped the image by doing these edits I changed the original image which was quite normal to a quite fun and funky by flipping the image on its own looked like a new image and by adding the bright red text to the top of the image draws your eye to it a bit like pop art.
Entering this module, I was very reluctant to use any editing apps at all. I have been taught by my tutors to always try to get right in the camera, but since I started this module it has kind of changed my mind a bit especially if you have taken a good image and you only need to turn the contrast up or play around with the white balance for it be a great image. Why not do them little tweaks but I only think you should use when necessary. I also think that there is no need to go overboard changing everything on them and turning your image into some like a HDR tool were your image looks like it is not a photograph it looks too much manipulated. I like to try keep it simple.
For my conclusion off these editing apps and module does using your phone to take images better than a digital camera?
For me it was not better it was easier, to use that your digital camera. I found that it would be for the easy option, of not having to carry the camera and the tripod in order to get a decent image but using the camera the image would be so much sharper and clearer than a phone. So, to concluded in my opinion, its very useful to have these editing apps available to use as future photographer as we need all the help we can get.
